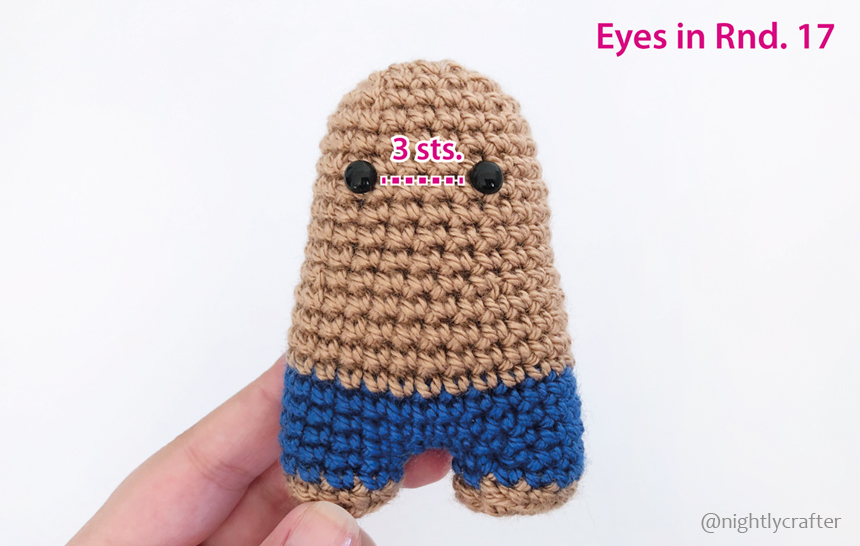
Elliot was born as part of the “Amigurumi showcase,” an Instagram competition hosted for some awesome crocheters from different parts of the world. I participated, and even though I wasn’t chosen to continue, I decided to share my pattern because I like Elliot a lot.
This little bear is french and is very shy but is trying to be bold with his clothes. He loves fashion and color, so today he’s bringing his best outfit to show you and inspire you. He dreams of being a fashion blogger next to his twin brother. Do you think they can do it?
Printable Version:
You can purchase a printable PDF version of this pattern in my Etsy shop HERE.
The PDF includes 10 pages with simple instructions and step-by-step pictures to crochet a cute Elliot. This pattern is available in two versions, one in English and one in Spanish, and you can download both if you want that.
Remember:
If you want to receive patterns like this directly in your mailbox, don’t forget to subscribe to my newsletter.
Materials:
- Crochet hook size 3,00 mm.
- Six different yarn colors (calling for 3,00 mm hook)
Yarn A (medium brown): For the body, arms, and ears
Yarn B (light brown): For the muzzle
Yarn C (blue): For the pants
Yarn D (yellow): For the hat and the middle of the bow tie
Yarn E (red): For the bow tie
Yarn F (dark brown): for embroidering the nose (you can use the medium brown also for this) - Synthetic Cotton /Toy filling (fiberfill or similar)
- Safety Eyes: 6 mm.
- Yarn Needle
- Scissors
Finished Size:
Approximately 4.3 inches (11 cms.)
Notes:
- The head, body, and feet are one piece together.
- When counting the rounds for attaching the pieces always count from the feet and up.
- The pattern is made to be work in a continuous spiral (do not join rounds) unless I indicated you to work in rows.
Abbreviations:
Rnd = Round
sts = Stitches
ch = Chain Stitch
sc = Single Crochet
sl = Slip Stitch
dec = Decrease (sc next 2 stitches together)
inc = Increase (sc in indicated stitch 2 times)
BLO = Back Loop Only
[…] x… = repeat instructions in brackets “x” times
(…) = total amount of stitches made in current rnd
Instructions:
Legs: Start with Yarn A – Make 2
First Leg:
Rnd. 1: 6 sc in a magic ring (6 sc)
Rnd. 2: [inc] x 6 (12 sc)
Rnd. 3: BLO 1sc in each sc around (12 sc)
Change to Yarn C.
Rnd. 4: 1sc in each sc around (12 sc)
sl in the first sc to finish the first leg.
* Now, cut the yarn and make a second leg the same way.
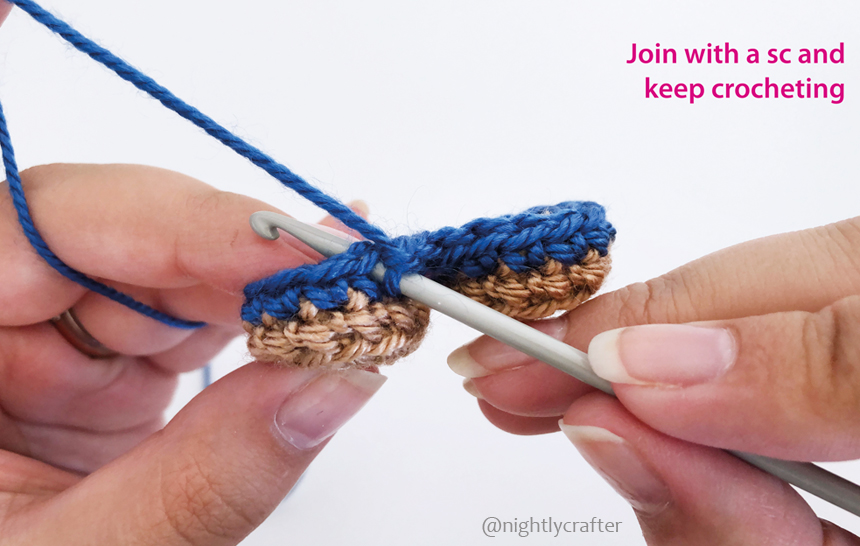
Second Leg: Repeat rounds 1 to 4, but this time don’t cut the strand. Then do 2 ch.
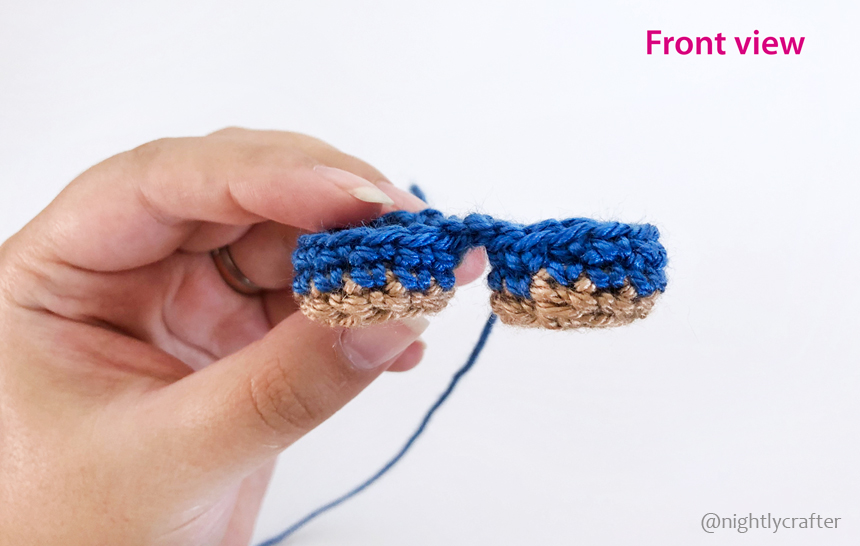
Rnd. 5: Take the first leg and join them with a sc. Keep crocheting around the first leg with sc. 2 sc along the 2 ch, and continue around the entire second leg (28 sc). See the following photos.
* From now on, the rounds continue, and the body/head of the bear begins.


Body: Continue with the color of the legs. (Yarn C)
Rnd. 6 – 8: sc in each sc around (28 sc – 3 rounds)
Change to Yarn A.
Rnd. 9 – 12: sc in each sc around (28 sc – 4 rounds) Remember to stuff the body as you go.
Rnd. 13: [5 sc, dec] x 4 (24 sc)
Rnd. 14 – 20: sc in each sc around (24 sc – 7 rounds)
Rnd. 21: [4 sc, dec] x 4 (20 sc)
Rnd. 22: [2 sc, dec] x 5 (15 sc)
Rnd. 23: [1 sc, dec] x 5 (10 sc)
Rnd. 24: [dec] x 5 (5 sc)
Finish stuffing the body and fasten off.
* Be careful! if you have safety eyes it’s important to place them before closing the body.


Muzzle: Yarn B – Make 1
Rnd. 1: 5 sc in a magic ring (5 sc)
Rnd. 2: [inc] x 5 (10 sc)
Rnd. 3: [inc, 1 sc] x 5 (15 sc)
Rnd. 4: 1sc in each sc around (15 sc)
* Before cutting the strand, leave enough yarn so that you can sew the muzzle to the body.
Arms: Yarn A – Make 2.
Rnd. 1: 5 sc in a magic ring (5 sc) Don’t fill the arms.
Rnd. 2 – 3: 1sc in each sc around (5 sc – 2 rounds)
* Before cutting the strand, leave enough yarn so that you can sew the arms to the body.
Ears: Yarn A – Make 2
Rnd. 1: 10 sc in a magic ring (10 sc) Don’t close the magic ring
* Before cutting the strand, leave enough yarn so that you can sew the ears to the body. (You should have two thread don’t cut any because both can be hidden inside of the body for a better finish)
Hat: Yarn D – Make 1
Rnd. 1: 5 sc in a magic ring (5 sc)
Rnd. 2: [inc] x 5 (10 sc)
Rnd. 3: [inc, 1 sc] x 5 (15 sc)
Rnd. 4: [inc, 2 sc] x 5 (20 sc)
Rnd. 5: 1sc in each sc around (20 sc)
Rnd. 6: [dec, 2 sc] x 5 (15 sc)
* Before cutting the strand, leave enough yarn so that you can sew the hat to the head.
Button: Yarn D – Make 1
For this piece work in rows.
3 ch.
Row 1: sl into the 2nd ch from your hook then 1 sl in each ch across (2 sl)
Cut the strand and use the yarn needle to pass both tails thru the middle of the hat (one in the middle and the other, one stitch away from that) and then make a knot inside of the hat with them. See the following photos.


Bow tie: Yarn E – Make 1
For this piece work in rows.
7 cad.
Row 1: sc into the 2nd ch from your hook then 1 sc in each ch across, turn (6 sc)
Row 2: 1 ch, 1 sc in each ch across, turn. (6 sc)
Row 3: 1 ch, 1 sc in each ch across. (6 sc)
* Cut the yarn and hide.
Now, cut a long thread of the Yarn D thread it in your yarn needle and make a knot at the end. Pass the yarn thru the center of the red part of the bow tie and then wrap it around of the middle several times while pulling to compress it. When you feel the bow tie is ready, secure the thread and leave enough yarn to sew the bow tie to the body. See the following photos.


Assembling:
Once all body parts are ready, you must sew the ears and the arms to the body and then the muzzle in the front (adding a little bit of filling), between the eyes. When the bear body is ready sew the hat (with a little bit of filling inside) and the bow tie. Finally, embroider the nose following the next explanation.

Sew the ears to the head between rounds 20 and 21. The arms between rounds 11 and 12. The muzzle between rounds 11 and 17.


Nose:
With medium brown (Yarn A), embroider the nose between the eyes starting from the bottom. Follow the numbers below:


Cheekies:
Color the cheeks using a fabric marker, chalk, or makeup, like blush or eye shadow (you can use a cotton swab for that).


And done! Now you have your own Elliot.
Remember that you can find the pattern for Elliot ready to download and print in my Etsy Shop HERE.
Please let me know in the comments or tag me in your photo on Instagram (@nightlycrafter) if you make him. I would love to see him!
Happy Crocheting!
Paula
© All rights reserved. This pattern is for personal use only; please do not copy or distribute this pattern.
You can sell finished products using this pattern, but you need to attribute design on me,
attaching the link to my blog: www.nightlycrafter.com ,
and you must also use your own photos to represent your work.
 English
 Español

Leave a Reply